Windows 10 Issues and Potential Solutions
This posting pulls together, in one place, several of the methods, steps, and procedures used by others to resolve their Windows 10 / My Cloud issues or problems.
Note: The compilation of methods and steps below may not solve your individual Windows 10 / My Cloud problem or issue.
One cannot stress this enough, if you have not already done so read the WD My Cloud User Manual!
UPDATE!!!
Before trying any of the methods, steps or directions below, update your Windows 10 computer with the latest Microsoft Windows 10 updates. It appears the KB 3140743 update released on March 1, 2016 fixes the issue of the My Cloud not properly showing up under Computer in Windows File Explorer.
Note: If you have performed the steps to change or disable the SMB 2 and SMB 3 versions within Windows 10 as described in Windows 10 Specific Method 6 below, you can reverse that change by issuing the following two commands through an elevated (administrator mode) command prompt.
sc.exe config lanmanworkstation depend= bowser/mrxsmb10/mrxsmb20/nsi
sc.exe config mrxsmb20 start= auto
For full directions see Re-Enable SMB2 & SMB3 below.
Initial General Methods:
If you cannot access the My Cloud by it’s name (ex. “WDMyCloud”) then try accessing the My Cloud by it’s IP Address.
It is generally recommended to configure the My Cloud with a Static IP. See this WD Support document for more information: http://support.wdc.com/KnowledgeBase/answer.aspx?ID=11384#cloud
The My Cloud, out of the box, defaults to using DHCP to obtain an IP Address. The problem with using DHCP is the IP Address computers and other devices may use to access the My Cloud can change, especially if one looses power, changes their router/gateway, or power cycles the network device. Using a Static IP Address fixes this issue by forcing the My Cloud to use the same IP address every time it starts up or is rebooted. There are two methods to creating a Static IP Address for the My Cloud.
General Method 1:
Access your router’s administration page and locate the option to Reserve IP Addresses. Using the MAC Address (found on the bottom of the My Cloud enclosure) to locate the IP Address the router has handed out to the My Cloud one can then reserve that IP Address so the router hands out that IP Address only to the My Cloud.
General Method 2:
Access the My Cloud Dashboard. Navigate to Settings → Network → Network services → Network Mode. Select Static. Click OK on the Change Network Mode message. On the Static Network Mode input the following information.
IP Address: [This is the Static IP Address]
Netmask: [Input the Netmask]
Gateway: [Input your router or gateway IP Address here]
DNS Server 1: [Input your Broadband provider’s DNS server(s), or use a Public DNS Server like Google (8.8.8.8)]
DNS Server 2: [Input your Broadband provider’s DNS server(s) if more than one DNS server, or use a Public DNS Server like Google (4.4.4.4)]
DNS Server 3: [Input a public DNS Server if needed]
Click the Save button when finished inputting the information.
The Network Profile may change indicating new Static IP Address.
General Method 3:
SMBv1 is not installed by default in Windows 10 Fall Creators Update. See this Microsoft article for more information.
WARNING!!! SMB1 should only be used as a last resort for any computer facing the Internet due to various security vulnerabilities present in the protocol. See the following Microsoft Blog post for more information on the various security vulnerabilities present in SMB1 and why it should not be used unless it is a last resort.
Proceed with the following at your own risk!!!
Ensure SMB 1.0/CIFS File Sharing Support is enabled under Windows Features. (Hat tip cat0w)
Open the Control Panel, then open Programs, then open Programs and Features. Next, select Turn Windows Features On or Off. Scroll down the list to find SMB 1.0/CIFS File Sharing Support. Enable it (put a check in the box) if it is not already enabled. Click/select the Ok button to close the dialog box. Then reboot/restart your computer to have the change take effect.

Note: WD has a Support Knowledgebase article detailing how to enable SMB1.
Windows 10 Specific Methods:
Note: The following steps while specific to Windows 10 may also apply to prior versions of Windows. These steps may not be the same in prior version of Windows.
Windows 10 Specific Method 1:
Check “Enable Netbios over TCP/IP”. Enable if not enabled.
- In the search field type: “network and sharing center” (without quotes) and select Network and Sharing Center.
- Select “Change adapter settings”
- Right click on the active Network Adapter and select “Properties”.
- Select "Internet Protocol Version 4 (TCP/IPv4) from the list, then select the “Properties” button.
- Select the “Advanced” button, then select the “WINS” tab.
- Select "Enable NetBIOS over TCP/IP. Then select the OK button to close each of the dialog windows.
- Reboot the computer.
Windows 10 Specific Method 2:
Configure the network connection so it is “Private” network and not a “Public” network. Sometimes when installing or updating Windows 10 it will configure your network connection as a “Public” network.
There are several ways to change the network connection to “Private”. See the following tinkertry.com link for several different methods: https://tinkertry.com/how-to-change-windows-10-network-type-from-public-to-private
The following animated graphic shows the general steps that should work for most (wired or wireless):

Windows 10 Specific Method 3:
Ensure you have enabled “Network Discovery and File Sharing” for the “Private” network otherwise Windows 10 won’t discover any network devices.
See the following Dummies.com How To link for general steps to activate Network Discover and File Sharing: http://www.dummies.com/how-to/content/how-to-enable-network-discovery-and-configure-shar.html
The basic steps, from Dummies.com, are as follows:
- Open Settings.
- Click Network & Internet.
- In the panel on the left, click either Wi-Fi (if you’re connected to a wireless network) or Ethernet (if you’re connected to a network using a network cable).
- Find the Related setting section on the right, then click Change Advanced Sharing Settings.
- Expand the network profile currently assigned to your network connection.
- In the Network discover section, select “Turn on network discovery”. Also, check the box that says “Turn on automatic setup of network connected devices.”
Windows 10 Specific Method 4:
Sometimes one has to hit the “refresh” button in Windows File Explorer to get Windows 10 to repopulate the network devices and show the My Cloud.
Windows 10 Specific Method 5:
Depending one one’s Windows 10 configuration, when one opens Windows File Explorer and selects or expands the Network entry, they may see a message that indicates; “Network discovery and file sharing are turned off. Network Computers and devices are not visible. Click to change…”
If this is the case, click the message to change the settings and select “Turn on network discovery and file sharing”.
A dialog message should appear giving you two options. Select the first option; “No, make the network that I am connected to a private network”.
Windows 10 will change the settings and the Windows File Explorer window should populate with discovered network devices including the My Cloud.
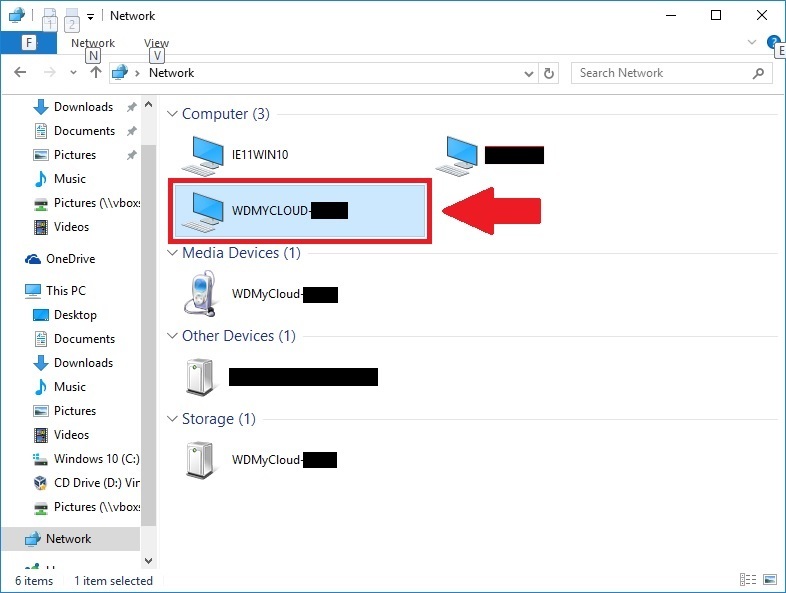
Note: The My Cloud will most likely be listed several times. Selecting the My Cloud icon listed under “Computer” should open the My Cloud and display the Shares (folders). Selecting the My Cloud icon under “Media Devices” may bring up the Twonky Administration page in the Web Browser. Selecting the My Cloud icon under “Storage” may bring up the My Cloud Dashboard in the Web Browser.
Windows 10 Specific Method 6:
Note: The following procedures assume the user is knowledgeable in using SSH and programs like WinSCP. And that the user has enabled SSH on their My Cloud. If one doesn’t know what SSH is or how to use it, or what WinSCP is or how to use it, please do a Google search to find out those answers. Using SSH may potentially void one’s My Cloud warrantee. It is possible if one isn’t careful to brick their My Cloud using SSH. SSH is enabled on the My Cloud Dashboard > Settings > Network screen.
Note: Use the following procedures at your own risk!!!
One can check their Windows 10 SMB setting by performing the following steps:
- In the Windows 10 Search field type “powershell”.
- Right click on Windows Power Shell, select Run as Administrator.
- Click Yes on the dialog box.
- In the command window, type the following:
Get-SmbConnection
A list of connected devices and their SMB version (under Dialect column) should be displayed. It will probably list 2.1 for the Dialect column.
Note: One can copy and paste (ctrl + c, and ctrl + v) the commands into both the Command Prompt window and the PowerShell window. Or one can right click in either window after copying to paste the text.
Issue: My Cloud is not listed under “Computer” in the Windows File Explorer under Windows 10.
Cause: There may be a potential SMB2 problem with Windows 10, with the My Cloud, or with the local network. There are several options to try if one is experiencing the SMB2 problem. Changing the SMB2 / SMB3 settings within Windows 10 will cause Windows 10 to use SMB1.
First option: Change the SMB setting within the My Cloud by using SSH to connect to the My Cloud then edit the “smb-global.conf” file located in the “/etc/samba” folder. One can use WinSCP (https://winscp.net/eng/download.php) to make the process of editing the file easier. It is recommended one make backups of any files they edit via SSH.
- Connect via SSH to My Cloud with WinSCP (or similar program).
- Navigate to the “/root/etc/samba” subfolder.
- Optional: Create backup of “smb-global.conf” file.
- Open (or Double click on) the “smb-global.conf” file.
- Scroll down the text to the “max protocol = smb2” entry. Change that entry to: “max protocol = smb1” or “max protocol = smb3”
- Save the changes.
- Close out of WinSCP (or similar program).
- Reboot the My Cloud (via the Dashboard or SSH reboot command).
After reboot check with Windows 10 File Explorer to see if the My Cloud is now listed under “Computer” in addition to “Media Player” and “Storage”. You may have to hit the Refresh button (or F5 key) to refresh the page.
Note: Unknown if this change to the “smb-global.conf” will be retained when or if the My Cloud firmware is updated or if a My Cloud reset or system restore is performed.
Second option: Disable the SMB2 & SMB3 client option within the Windows 10 computer. Note: The information in this option was taken from the following Microsoft document: https://support.microsoft.com/en-us/kb/2696547
Disable SMB2 & SMB3:
- In the Windows 10 Search field type “cmd”.
- Right click on Command Prompt, select Run as Administrator.
- Click the “Yes” button in the “Do you want this program to make changes to your computer” dialog box.
- In the command window, type the following commands hitting the enter button after each line:
sc.exe config lanmanworkstation depend= bowser/mrxsmb10/nsi
sc.exe config mrxsmb20 start= disabled
Reboot the computer and check with Windows File Explorer to see the status of the My Cloud under “Computer”. It should now be listed. You may have to hit the Refresh button (or F5 key) to refresh the page.
Note: Re-Enable SMB2 & SMB2 is only needed if one wants to revert Windows 10 SMB settings back to default after disabling SMB2 & SMB3 utilizing the previous steps.
Re-Enable SMB2 & SMB3:
- In the Windows 10 Search field type “cmd”.
- Right click on Command Prompt, select Run as Administrator.
- Click the “Yes” button in the “Do you want this program to make changes to your computer” dialog box.
- In the command window, type the following commands, hitting the enter button after each line:
sc.exe config lanmanworkstation depend= bowser/mrxsmb10/mrxsmb20/nsi
sc.exe config mrxsmb20 start= auto
Reboot the computer and check with Windows File Explorer to see the status of the My Cloud under “Computer”. The My Cloud may no longer be listed under “Computer”
Notes:
These commands must be run from an elevated command prompt.
You must restart the computer after making these changes.
Third option: The following option was taken from this thread. It will require your router or gateway to have an option to configure the router / gateway as the “Samba Master Browser” AND will require the editing of a file on the My Cloud via SSH to change several of the SMB settings. Check your router / gateway’s administration or configuration pages to see if it has an “Samba Master Browser” option.
-
Access the router / gateway’s administration or configuration page.
-
Enable “Samba Master Browser” on router / gateway.
-
Reboot router/ gateway.
-
Using SSH and WinSCP or similar program log into the My Cloud.
-
Navigate to “/root/etc/samba/”
-
Optional: Create backup of “smb-global.conf” file.
-
Open / edit the “smb-global.conf” file and edit the following lines to match:
[global]
local master = no
domain master = no
preferred master = no
os level = 0 -
Save the changes, exit SSH, reboot the My Cloud.
When the My Cloud has finished rebooting (has blue LED) check with Windows File Explorer to see the status of the My Cloud under “Computer”. It should now be listed. You may have to hit the Refresh button (or F5 key) to refresh the page.
Windows 10 Specific Method 6 General Note: It is unknown how making either of these changes will affect copying speed or access to other NAS or network drives with Windows 10.
Windows 10 Specific Method 7:
In certain cases Windows 10 may require a “PIN” rather than password to log into Windows 10. It has been indicated (see this post) that if one uses a “PIN” to sign into Windows 10 they may have trouble accessing the My Cloud, and or the My Cloud may not show up properly on the local network.
Workaround: Sign into Windows 10 using a password rather than “PIN”. H/T - lamwilli
If router/gateway supports Master Browser:
If one has a router/gateway that supports enabling the Master Browser option, enable that option on the router. Note: Generally one has to enable USB/FTP sharing or the Samba file server on the router/gateway in order to be able to enable Master Browser on that same router/gateway.
Once Master Browser has been enabled on the router/gateway, reboot the Windows 10 computer and recheck if the My Cloud shows up under Computer.
Typically the option to enable Master Browser is located under the Samba settings on those router/gateway units that support Samba file sharing.
Windows 10 KB3124263 Update:
One user reports KB312463 update fixed (for them) the issue of the My Cloud not showing up under Computer.
Firmware v2.x My Cloud Specific
It has been reported (see this thread) that v2.x My Cloud may also suffer the missing My Cloud from Windows File Explorer in Windows 10 issue as the v4.x version sometimes does.
The v2.x My Cloud User Manual indicates (see page 62) there may be an SMB setting option under Windows Services (Workgroup) in the Dashboard. If this is the case, try changing the SMB setting from the default of SMB 2 to SMB 1 or SMB 3. Reboot both the Windows 10 computer and the My Cloud and test Windows File Explorer again to see if the My Cloud shows up under Computer.
Mapped Drive Issues:
When Computer Boots Message Indicates “Could not reconnect all network drives”:
This may happen not only in Windows 10 but in prior versions of Windows. Due to how Windows boots it may indicate mapped drives couldn’t be reconnected. The cause for this may be due to Windows trying to access a mapped drive before a Network Connection to the local network has been established. The mapped drive may show a RED X when viewed in Windows File Explorer. Simply selecting or clicking on the mapped share should reestablish the connection and the RED X should disappear from the mapped drive icon/entry.
Unable to access Mapped Drive in Windows Programs After Booting Or Rebooting Windows:
If after a boot or reboot, the WD My Cloud mapped shares are unavailable to Windows programs, open Windows File Explorer and click on the mapped share should reestablish the connection.
Problems With Logging Into Private Share:
With all versions of Windows one may have various issues accessing Shares marked as Private. If this is the case ensure the Private Share has User’s assigned with the appropriate user access and that those Users have Passwords.
If mapping a Share, make sure to tick the “Remember my credentials” box if available. In certain instances you may have to select the “Connect using different credentials” option.
General Notes That Apply To Windows In General:
Certain versions of Windows (like Windows 7) will only allow a user to have one login credential for mapped drives. This means you cannot use multiple User names/passwords to access different Private Shares. The workaround, if using the My Cloud Administrator User account, is to grant the My Cloud Administrator User permission to access all Private Shares on the My Cloud. Then use the My Cloud Administrator User name/password when mapping another User’s Private Share.
In certain cases, when using Windows 7, one may have to delete the existing Windows Credentials. See the following Windows page for more information on how to delete Windows Credentials: http://windows.microsoft.com/en-us/windows7/remove-stored-passwords-certificates-and-other-credentials
The basic steps from that Microsoft link:
- Open User Accounts by clicking the Start button Picture of the Start button, clicking Control Panel, clicking User Accounts and Family Safety (or clicking User Accounts, if you are connected to a network domain), and then clicking User Accounts.
- In the left pane, click Manage your credentials.
- Click the vault that contains the credential that you want to remove.
- Click the credential that you want to remove, and then click Remove from vault.
Note: Additional information may be added to this post as it becomes available.
