I put back the original hard drive and having same issues ie not getting green light and can’t find on network.
I have finally managed to install and run the 4TB disk that replaces the 2TB disk I had, but before I discuss which method worked for me, my personal warning: The method relies on a previous disk image that could very well contain malware, as it incorporates easily modifiable scripts among the many contained in the original software. That is, I used this method because my hard disk does not contain sensitive information or personal data, only multimedia files that are available on the Internet. Besides, my LAN is made up of Linux computers and each of them is protected, I do not share using SAMBA, so I am not too concerned about the security issue, except for the fact that my MyCloud account data DOES have to be provided to the software of these images of “unknown” origin.
That said, the method I have followed is the one mentioned in this thread “Unbricking WD Mycloud gen 2. SOLVED!”. although after so many tests, I don’t remember if I formatted both sdX2 and sdX3 or just sdX2.
The system booted up, formatted the hard drive (to JBOD, of course) in just 2 seconds (I was amazed) and then allowed me to upgrade to MyCloud OS 5 without any problems.
I thank EVERYONE who has been listening to my questions and answering them, because thanks to them I can finally continue to enjoy my NAS.
Thank you very much!!!
1 Like
Congrats. Finally you did it.
Did you ever get your issue resolved Reven? I was wondering if maybe some of the software resided in firmware in the devices and not on the hdds themselves. That software might not recognize the new, larger cloned drive correctly. I’m planning on upgrading my old 4Tb WD to an 8Tb WD Red CMR drive that I just bought. Hopefully I won’t have any problems but we’ll have to see how it goes.
In addendum I setup a simple website on the NAS apache instance just for a proof of concept. I’m just running it on a separate directory I made underneath the Apache main directory /var/www/htdocs and haven’t routed it out to the www.
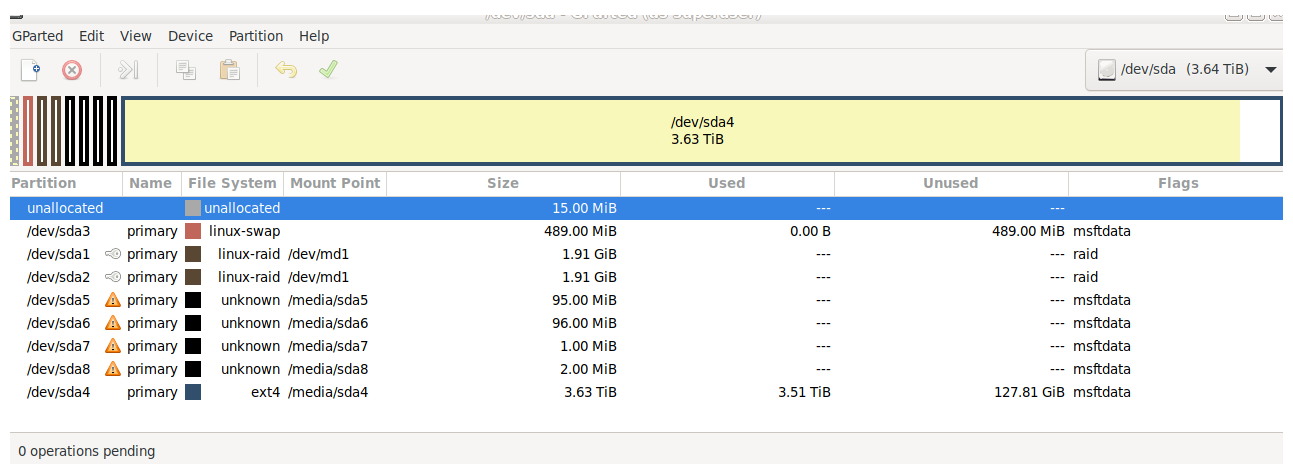
I tried this method (Going from 4Tb driver to 8Tb drive) and after 10 hours of cloning with Clonezilla and then using Gparted to extend the data partition from 4Tb to 8Tb thought all was well. Reinstalled the drive back in the enclosure and… nothing… The red light was on as well. Took the new 8Tb drive out and hooked it and the old 4Tb drive up to a PC to compare them. The new 8Tb drive has all of the partitions it’s supposed to have but the Linux swap partition and the two RAID partitions were not formatted correctly so am at a bit of an impasse now. All 4Tb of the data looks like it got moved over correctly though. Anyone have any suggestions as to how to proceed from here? I’d rather not have to clone the whole thing over if I can just format the partitions correctly and apply images to some if necessary. There are 4 partitions on both drives that can’t be mounted (At least not easily) via Linux or Windows. I’m guessing that’s where some of the OS resides? I don’t know if the data got moved correctly to those or not during the cloning process. I ran Clonezilla in the " disk_to_local_disk local_disk_to_local_disk_clone" mode as was shown above.
Thanks for any suggestions!
Here’s a couple pics - one is of the original 4Tb drive and the other is of the new 8Tb drive.

PS who designed these enclosures with the crummy plastic tabs? Bad design if you ask me, they’re a pain to take a part and the thin plastic tabs break easily. Good thing I had a hot glue gun on hand.
Unfortunately I don’t have a new suggestions. Before you expand your partition both HDDs should look like the same in Gparted.
File system from sdc3, sdc1, sdc2 should looks like “linux-swap, linux-raid, linux-raid”.
Did you attempt to access the My Cloud Dashboard after booting up the My Cloud and it showed a red front LED? Sometimes the Dashboard is still accessible even with a red front LED. If one can access the Dashboard to Settings > Utilities > System Factory Restore and perform a System Only restore. That typically fixes the front red LED on unbricked single bay My Cloud units.
Generally when performing an unbrick one only formats the data partition (sdx4) on the first gen single bay My Cloud.
Personally I ran into problems with Clonezilla at first not properly cloning between two drives when using a desktop PC and it’s two SATA ports. In my case putting one of the drives on a USB to SATA adapter worked.
I was able to format the swap file partition and create the raid partition but I’m not sure how to format the raid partition. It looks like that’s the partition with the OS files on it. I was going to try formatting it and then copying the files over from the old drive.
No luck at all getting into the Dashboard. I don’t think the OS partition was created correctly by Clonezilla and none of the Linux OS files are present. The MyCloud device doesn’t show up as a device in my router at all.
Do you happen to have a copy of the original step-by-step command line instructions for a Gen1 MyCloud? The fox-exe.ru site doesn’t have the info any longer…
https://fox-exe.ru/WDMyCloud/
Thanks!
I’ve got the swap file formatted correctly and created the linux-raid but not sure if I need to format that md1 volume or not. Does anyone have a copy of all of the commands and steps to do things manually?

So I think I’m going to try applying the rootfs.img to the md1 linux-raid partition. But, what version of rootfs.img to use? My 4Tb system was up-to-date on firmware etc. so I’m thinking the latest version available? Where to download from? I got the file from Perdigao’s website but this looks to be an older version. Any suggestions? I’m thinking even if I applied an older image I could update later once it’s running again? My only concern is that some of the files on the other partitions might not jive with an older version. Does anyone have any idea what partitions 5, 6, 7 and 8 are for? They are all pretty small in size.
Thanks!
Someone mirrored the files on the Fox-exe.ru site to another location. For the single bay first and second gen My Cloud’s see the following links:
https://wd.hides.su/fox_exe/WDMyCloud-Gen1/
https://wd.hides.su/fox_exe/WDMyCloud-Gen1/Replace%20HDD%20-%20English.txt
https://wd.hides.su/fox_exe/WDMyCloud-Gen2/
https://wd.hides.su/fox_exe/WDMyCloud-Gen2/_Unbricking_en.txt
The directions to unbrick are different for each version. Generally one only needs to format the data partition, all other partition are not formatted. For example:
First Gen Single Bay
1. Use fdisk -l (or parted -l) for see what name have you WD's HDD.
* For me - its /dev/sdb. Replace it to your hdd name!
2. Run parted utility:
parted /dev/sdb

3. Type "print" for see what partitions exist on disk
4. Remove all: Type "remove 1" (where 1 - number of partition)
5. Crete new table:
mklabel gpt
mkpart primary 528M 2576M
mkpart primary 2576M 4624M
mkpart primary 16M 528M
mkpart primary 4828M 100%
mkpart primary 4624M 4724M
mkpart primary 4724M 4824M
mkpart primary 4824M 4826M
mkpart primary 4826M 4828M
set 1 raid on
set 2 raid on

6. Ok, type "quit"

7. Format data partition:
mkfs -t ext4 /dev/sdb4
mkswap /dev/sdb3
Second Gen Single Bay
5. Format HDD if need:
parted /dev/sda
mklabel gpt
mkpart primary 1049kB 2149MB
mkpart primary 8591MB -1MB
mkpart primary 7517MB 8591MB
mkpart primary 2149MB 3222MB
mkpart primary 3222MB 4296MB
mkpart primary 4296MB 6443MB
mkpart primary 6443MB 7517MB
q
mkswap /dev/sda1
mkfs.ext4 /dev/sda3
Generally the unbrick method created by user Fox_Exe uses older firmware (v3.x/v4.x for first gen and v2.x for second gen). After successfully unbricking the My Cloud one can manually update to the latest firmware version (first gen v4.x or second gen v2.x) for their single bay unit. One can download the latest My Cloud firmware from the WD Support website (Support link top of page).
They’re required for the My Cloud operating system. They are used to store the firmware and run the operating system after bootup. The user “Share” data folders/files are stored on a single partition that is formatted for EXT4. (Typically: first gen - /sdx4 for second gen -/sdx3.)
Thanks for the info Bennor! That makes sense to only format the data partition since the others are all created from images of already formatted drives. What I’d like to try doing now is to apply the images to the other partitions and keep the data partition the way it is since all of my 4Tb of files are already there. Where to download the .img files from? Do you know if there are newer versions or is it Ok to just use the old ones from 2014 or so when these devices where new? I guess that could work and then just perform the updates from the device once it’ up and running again.
One thing that is different on my device is the RAID partition was called md1 instead of md0 as I’ve seen in these docs. Any idea why that is different on my device?
I think I’ll make copies of those fox-exe files too for future use. Who knows how long that mirror will be online for.
Thanks again for the info!
The first gen single bay My Cloud “img” files referenced in the previously posted Fox_Exe unbrick directions are located in either of the two files mentioned in the unbrick directions:
original_v03.04.01-230.tar.gz
original_v04.01.02-417.tar.gz
When either file is fully extracted one should have three img files; kernel.img, config.img and rootfs.img.
Per those directions:
10. Download one of arhive's to /mnt folder:
v3.04.01-230: https://fox-exe.ru/WDMyCloud/WDMyCloud-Gen1/Backups/original_v03.04.01-230.tar.gz
v4.01.02-417: https://fox-exe.ru/WDMyCloud/WDMyCloud-Gen1/Backups/original_v04.01.02-417.tar.gz

11. Extract by console:
tar xvfz original_v3.04.01-230.tar.gz

12. Ok. Upload backup images to WD's hdd:
dd if=kernel.img of=/dev/sdb5
dd if=kernel.img of=/dev/sdb6
dd if=config.img of=/dev/sdb7
dd if=config.img of=/dev/sdb8
dd if=rootfs.img of=/dev/md0
After unbricking one would then download the latest firmware for their My Cloud and perform a manual update.
1 Like
Thanks Bennor! Any idea what the difference is between the two versions?
original_v03.04.01-230.tar.gz
original_v04.01.02-417.tar.gz
My device is one of the older ones from 2014. Either version should work?
Either version will work on a first gen (P/N ending with “-00”) single bay My Cloud. V3.x is just the older initial firmware the first gen single bay My Cloud used before WD moved to OS3 v4.x firmware for the first gen single bay My Cloud. There was a time where people wanted to use the older v3.x firmware due to running specific features that were no longer available in the later v4.x firmware. No matter which version one uses , the first gen single bay My Cloud can be updated to the latest OS3 v04.06.00-111 (4/15/2022) firmware.
See the first gen single bay My Cloud firmware release notes for a history of the firmware used on that device:
https://support.wdc.com/download/notes/WD_My_Cloud_Firmware_Release_Notes_04.06.00-111.pdf
1 Like
She’s back up and running again now Bennor. I did get a SMART drive (error 0003) warning once I was able to access via the http frontend. I thought I heard the drive making some strange noises when I first installed it too… I ended up being able to save the ext4 data partition from the original cloning process and applied the .img files to the other partitions. I also remade the RAID partition and named it md0 like the guide says to do instead of md1 as was the name on my original 4Tb drive. I hope this SMART drive thing isn’t a deal breaker and I have to ship the 8Tb drive back… We’ll see how it goes. I think if I have to do it again I’ll just do it from the guide and hook the two drives up on a SATA bus and do the 10 hour transfer that way and forget about the Clonezilla part - that seems to be where the problems came in. Clonezilla isn’t supposed to be able to clone a Linux RAID partition so I don’t know how that one guy got it to work that said he did it that way…
Thanks again for all your good advice!
Ok, so now I’m debating whether or not to ship this new drive back as defective… The red light on the NAS is on constantly now and I have been getting those SMART drive warnings too… Thoughts?


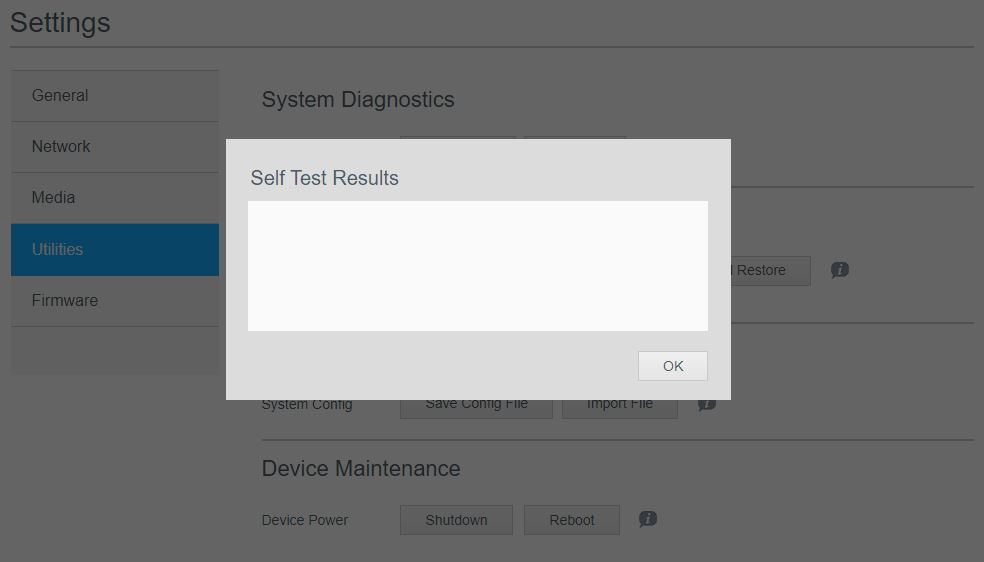
I am able to login to the http GUI and seems to be working fairly well but these SMART warnings are concerning. Also, the “Systems Diagnostics” Quick Test and Full Test don’t seem to be working. When I try to run a test it pauses for a round 3 seconds before returning a blank screen for “Self Test Results.” Any ideas / thoughts on this?
Thanks, Superswade
If one hasn’t done so after unbricking their My Cloud one should try a System Only restore. It sometimes will clear various errors or issues one may get after unbricking a single bay My Cloud.
My Cloud Dashboard > Settings > Utilities > System Factory Restore > System Only restore
WD has this Knowledge Base article that may or may not be relevent to the specific error the My Cloud is indicating.
WD Self-Monitoring, Analysis and Reporting Technology (S.M.A.R.T.)
https://support-en.wd.com/app/answers/detailweb/a_id/12163
One could enable SSH in the My Cloud Dashboard > Settings section and connect to their My Cloud using SSH to issue the following Linux command to see what it indicates. It may possibly show what ever the error is that the My Cloud Dashboard is generating.
smartctl -H /dev/sda
One could remove the My Cloud hard drive from it’s enclosure, attach it to a computer and see if they can get more information about the S.M.A.R.T. error. There are various programs out there one can download/install that will show or display the S.M.A.R.T. information and or any errors it may be generating.
While rare its possible one may have gotten a bad hard drive, or one that was damaged in shipping, or one that was used/returned that was repackaged by the seller as “new”. It happens.
1 Like
“mkswap: cannot open /dev/sdg1: Device or resource busy” kept preventing me from a successful implementation of this instruction for a 2nd Gen. (WDBCTLxxxxxxx-10) My Cloud.
If ignoring this message, it got stuck in Safe mode with a firmware version 1.0.1.007 (as described in WD MyCloud Stuck in safe Mode) and got stuck in updating a firmware forever (even after performing the 40-second factory reset ).
Any hints would be appreciated.